Automatic coding in dataset sources
You can use auto coding to organize dataset content into nodes for further exploration. This topic explains how auto coding works in different types of datasets and explains how to get started with the Auto Code Assistant.
You need NVivo for Mac 10.2 or later to auto code datasets.
What do you want to do?
- Understand automatic coding in datasets
- Auto code a dataset at nodes for selected columns
- Auto code a dataset at nodes for each value in a column
Understand automatic coding in datasets
A dataset contains structured data arranged in records (rows) and fields (columns). Datasets can contain classifying columns and codable columns. You can use the Auto Code Assistant to code content of codable columns.
You can auto code based on the rows or columns in your dataset. You can choose to:
-
Code at nodes for selected columns
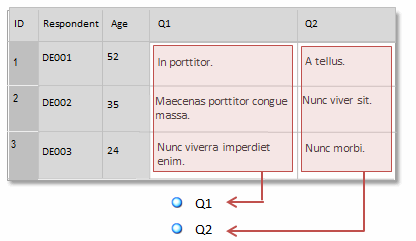
For example, If you have imported survey results from a spreadsheet, you can auto code to gather all the responses for each question.
The image below shows a dataset containing survey responses to two questions. With auto coding, you can create a node (Q1 and Q2) for each question. The responses to each question are automatically coded at the relevant node.

Refer to Auto code a dataset at nodes for selected columns for detailed instructions.
-
Code at nodes for each value in a column
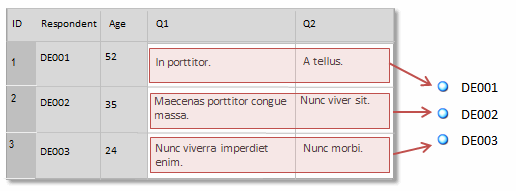
For example, if your dataset contains survey results, you can auto code to gather everything a particular respondent has said.
In the image below, a node is created for each respondent (DE001, DE002, and DE003) and the responses are coded at the relevant node.

If you have collected demographic information about the survey respondents, you could auto code based on the values in other classifying columns—for example Gender. You can also group the responses together to create and code at a node for each demographic group—for example Male and Female.
Refer to Auto code a dataset at nodes for each value in a column for detailed instructions.
Auto code a dataset at nodes for selected columns
-
In List View or Detail View, click on the dataset you want to auto code.
-
On the Analyze tab, in the Coding group, click Auto Code.
The Auto Code Assistant opens. Follow the steps on the Assistant.
| Assistant step | Description |
|
Choose how you would like to code at nodes |
Choose Code at nodes for selected columns to create and code at nodes based on the columns in the dataset. For example, you can create a node for all Question 1 responses, and another node for all Question 2 responses. |
|
Select the columns you want to create as nodes. |
Select the columns that you want to create nodes for. All the codable columns are selected by default. You can remove a column—click a column in the Selected columns list and then click the left arrow < to move it to the Available columns list. The preview area shows the nodes that will be created based on the options you have selected (you can choose a location for the nodes in the next step). |
|
Select a location for the nodes. |
You can store the nodes under a new node or under an existing parent node. The preview area shows the node structures that will be created. |
Auto code a dataset at nodes for each value in a column
-
In List View or Detail View, click on the dataset you want to auto code.
-
On the Analyze tab, in the Coding group, click Auto Code.
The Auto Code Assistant opens. Follow the steps on the Assistant.
| Assistant step | Description |
|
Choose how you would like to code at nodes |
Choose Code at nodes for each value in a column to create and code at nodes based on the values in the columns of the dataset. For example, you could create and code at a node for each respondent in your survey. |
|
Select the columns that contain values you want to use as node names |
Select the column that contains the names of your nodes—these are the nodes that will contain the coded content. For example, if you want to create a node to represent each person you surveyed, you could select the column which contains their name or some other identifier. You should ensure that each cell in this column contains a different value. If two people share the same name, only a single node will be created. The preview area shows the nodes that will be created based on the options you have selected. |
|
Select a location for the nodes. |
You can store the nodes under a new node or under an existing parent node. Decide whether you want to turn on aggregation for parent nodes—if you select this option, then all the content coded at the children is shown in the parent node. Refer to Aggregate nodes for more information. |


