


Introducing the work area
This topic describes the main elements of the NVivo work area and provides links to other useful topics—for example, topics that explain how to customize the work area to suit the way you prefer to work.
What do you want to do?
- Identify the different parts of the NVivo work area
- The menu bar
- The Ribbon
- Shortcut menus
- Navigation View
- Open Items list
- List View
- Detail View
- The project log
- The Status bar
Identify the different parts of the NVivo work area
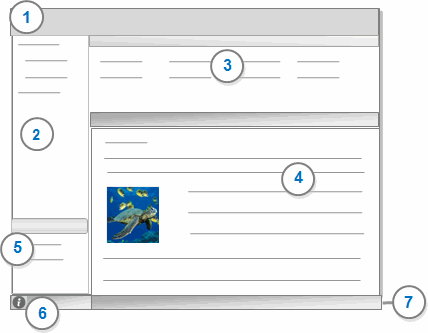
1 Menu bar and ribbon
2 Navigation View
3 List View
4 Detail View
5 Open Items
6 Project log (open it from here)
7 Status bar

The menu bar
The menu bar at the top of the screen provides access to the commands you need to use when you are working with the software:
-
The NVivo menu gives you access to information about NVivo, NVivo preferences, license activation and software updates.
-
The File menu provides access to project properties and project-related commands—for example, commands to open, save and copy projects and print project items.
-
The Edit menu provides access to the undo command, clipboard commands such as copy and paste and commands used to edit the content in your sources. Some of these commands are also available on the Home tab in the ribbon
-
The Create, Data, Analyze, Query, Explore, Layout and View menus contain commands that are on the equivalent ribbon tabs.
-
The Window menu provides access to commands such as minimize and zoom, and the command to display the Welcome to NVivo window.
-
The Help menu provides access to a range of support resources, including the NVivo Help, keyboard shortcuts, the Getting Started Guide and video tutorials.
If you cannot locate a command on a menu, you can use the Help menu to find it in other menus:
-
Open the Help menu and then type part or all of the command name in the search field.
-
When you see the command you are looking for listed in the Help menu, choose it.
The Ribbon
The ribbon can help you to quickly locate commands. Commands are organized into logical groups, collected together under tabs. Each tab relates to a type of activity, such as creating new project items or analyzing your source materials.
Refer to Use the ribbon, for detailed information about working with the ribbon. Refer to NVivo ribbon tabs for an overview of the commands on each ribbon tab.
Shortcut menus
Shortcut (or contextual) menus are available in List View and Detail View. You can access the most frequently-used commands via the shortcut menus. For example, you can use the shortcut menus to print a source selected in List View or code content selected in Detail View.
To open a shortcut menu, click in List View or Detail View and then hold down the Control key and click.
You can also access the shortcut menus in these ways:
-
If you have a trackpad that supports gestures, you can use a two-finger tap
-
If you have a multiple-button mouse, you can configure the mouse to access shortcut menus by right-click or your preferred method.
If you have selected items in List View or content in Detail View you will have more options on the shortcut menu—for example, the command to code content is only available if you have selected content to code before you open the shortcut menu.
Navigation View
This view provides access to all your project items. Items are organized into folders—for example, Sources, Nodes and Queries. When you click on a folder in Navigation View, its contents are displayed in List View.
You can access Navigation View folders using the Go commands—refer to Accessibility for more information.
You can add custom folders to organize your project items In Navigation View. Refer to Work with folders for more information.
Open Items list
All items that are open—for example, sources, nodes and unsaved query results—are shown in the Open Items list at the bottom of Navigation View.
The item currently displayed in Detail View is highlighted in the list, if you want to switch open items (show a different open item in Detail View), select a different item in the Open Items list.
To close an
open item, click the Close button  beside the item.
You can close all open items by doing one of the following:
-
Click the title of the list Open Items, and then click Close All.
-
On the View tab, in the Application group, click Close All.
List View
This view displays the contents of your folders. You can double-click an item in List View to open it in Detail View.
In List View, you can:
-
Sort items (by clicking on the column headings)
-
Delete, copy and paste, or move items
-
Add selected sources or nodes to sets
Detail View
Detail View is the main part of the NVivo work area—when you open a source or node it is displayed in Detail View.
If you open multiple items, the one you are currently working with is displayed in Detail View—all open items are listed in Navigation View, click on another item in the list to show it in Detail View.
To close a source,
node or other open item, click the Close
button
in the Open Items list in Navigation
View. To close all open items; on the View
tab, in the Application
group, click Close All.
The project log
The log displays a record of import and export operations that you initialize—for example, importing and exporting sources.
To open the
log, click the log icon ![]() at
the bottom left of the NVivo window. If an error is recorded in the log,
the icon changes to an exclamation mark
at
the bottom left of the NVivo window. If an error is recorded in the log,
the icon changes to an exclamation mark ![]() .
.
By default, the log is automatically displayed when an error is recorded. For example, if a document fails to import because the file type is not supported. If you do not want the log to display automatically, open the log and then clear the Show automatically check box.
The log is automatically cleared when you close your project. If you want to retain the information currently in the log, save the log before you close the project.
To save the log entries to a text file, open the log and click the Save button.
To clear the log, open the log and click the Clear button.
The Status bar
The Status bar displays contextual information that varies depending on what you are doing in your project. For example, when you have a source open in Detail View, the Status bar shows the folder location of the source within your project.